You are currently browsing the monthly archive for September 2010.
I went on a spontaneous trip to Ocean City, Maryland a few days ago. I’d been told for two years that I needed to go, and I felt like I had missed the ocean for long enough that when I was given two days off in a row, I took it as a sign. Bags were packed and I was off for my semi-spontaneous excursion all by myself! I had a very good time, and I’m glad I went, but I don’t know if Ocean City is really my brand of vacation. One too many neon lights, and a beach so clean you could eat off it- something felt a little out of place in my heart, not to mention I couldn’t find a place to get a cup of coffee anywhere in 100 blocks. How does that happen? I thought Starbucks had invaded every city on Earth!
Here are some pictures of the trip:

My favorite experience of the trip was walking down the boardwalk at dusk with the full moon over the water and a caramel apple in my hand. Yum!
And I want to thank this store for existing in a slew of plastic made-in-China storefronts:
Salt Yarns What a great store! Packed to the brim with exciting needlepoint patterns, yarns, and I even found some teeny tiny 20 gauge DMC floss for necklaces!
On the way home I stopped at the Chesapeake Bay Bridge State Park. It was really nice! I found some super-smooth stones and glass, (I’m such a hoarder).

A good friend of mine who has been getting me and my bank account into all sorts of trouble with beads just opened her own Etsy shop online. She has some beautiful jewelry, and a gorgeous sense of color, so I’m linking to her site here: Dinalae
Take a peek, and enjoy!
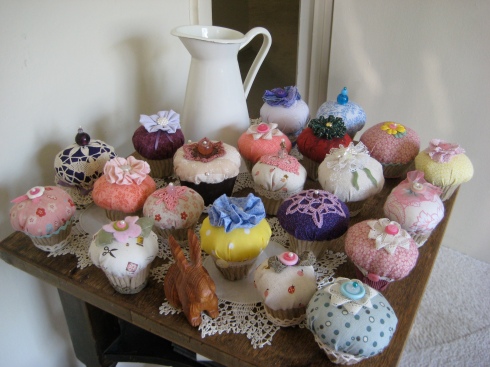
I’ve had cupcakes on the brain, and it’s beginning to show- 20 cupcakes done for the Littleton Craft Fair, October 3rd. I hope they look pretty on my mother’s tiered cupcake stands she’s been so busy making. From the sound of it, I’ll have half of a cupcake for every stand she’s made so far. Ha! Go mom!
Canning is a craft.
It’s the art of taking what you’ve got in one moment and putting it in a jar to save for another moment.
This doesn’t have to apply solely to food, you know.
I recently read the book, “The Particiular Sadness of Lemon Cake” by Aimee Bender, in which the main character could taste the emotions of the person who made the food she was eating. She could taste spite, jealously, anger, love- you name it, she could taste it. That got me to thinking about how we view food.
Does an organic apple tastes better than a non organic apple because we know it’s organic, and therefore better for us?
Does an apple bought at Whole Foods taste better because the store is in many ways “more green” than other stores?
Does an apple bought from a farmer taste better because we’re taking it from his hand who grew it and we feel a human connection to our food?
And finally- does an apple taste the best when we nurtured it ourselves, picked it ourselves from the tree and set it to our lips?
I think so.
I think it tastes better in the same way that a plate of gorgeously set nigiri-zushi at a restaurant tastes better than a grocery-store plastic box of the same food. or imagine if you just took that hamachi on its bed of rice and threw it in the blender, serving it in a cup? Presentation matters! Our brain tells us if we should or shouldn’t like something before it ever hits our mouth. So that means our moral part of our brain must care, too!
Food we grow ourselves tastes better because we know exactly where it comes from.
Food we can ourselves tastes like love, because we know how much effort it took to can those peaches, apples, and pickles- we know it’s probably cheaper to buy aluminum canned products at the store, but we did it anyway.
Why?
Because we’re in the business of canning emotions in with our foods.
Have some love with your peaches.
These are the kind of cupcakes I’m helping my mother to make for the Littleton, Colorado Craft Fair October 3rd. I couldn’t find a tutorial online for the kind of cupcake I wanted to make, so I thought I’d share my experiments here. Let me know how yours turn out!
Materials:
Glue, scissors, pen, stapler
Scrap corduroy for the base (I used an old pant leg)
Scrap of fabric for the “muffin top” part of the cupcake
Thin cardboard like from a cereal box
Batting (stuffing)
Lace
Buttons
(You can put emery sand in the bottom of your cupcake to keep it weighted and sharpen your needles over time.)
Step one:
Gather Materials.
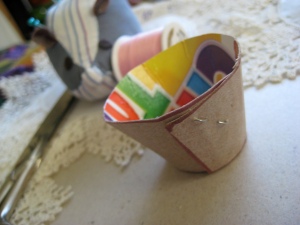
With a pen sketch out an arch like the one pictured below on a piece of cardboard. Cut it out and curl it around like a funnel to see if the proportions fit. If not- try again. This is how I found the shape and size I wanted. You can always cut open a real cupcake sleeve to get the idea.
Step Two:
Once you have your arch defined, secure the funnel with a staple to hold its shape. It should stand flat at this point.
Step Three:
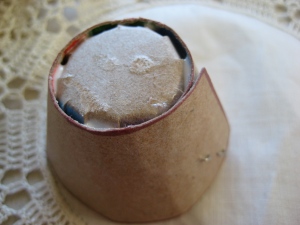
Cut out the base of the cupcake. The circle cut must be a little larger than the circle left open at the bottom of the funnel created in step 2. Cut little slits into the circle towards the center, radiating around the piece. These pieces will be folded inward, making the shape seen above.
Step Four:
Glue around the outside of the tabs created in step 3 on the circular bottom piece, and then slip into the funnel, pressing into the bottom to make the cupcake “sleeve.” Press onto table to ensure flatness. Let dry.
Step Five:
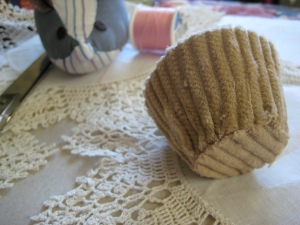
Glue around the outside of the funnel piece, around top edge, bottom edge, and a zig-zag of glue between them. Adhere the corduroy to one side, working your way around the piece. If you cut out a strip of fabric, you will have to pulls the fabric together around the bottom to keep the lines vertical. It will bunch a little, but the glue should old it down. I leave enough to hang off the bottom and top at least 1/4 of an inch. Then I cut darts into the bottom and glue it flat to the base, and glue around the top and curl the fabric into the inside of the funnel.
Step Six:
Cut out a circle of corduroy for the base and glue it to cover the overlapping darts from step five.
Let dry.
Step seven:
Cut out a circle of fabric to represent the top of the cupcake. Sew a running base stitch around the circumference of the cupcake. Pull the string to draw fabric in.
Step Eight:
Stuff with stuffing tightly, pull in fabric with thread to desired size. Secure with stitching.
Step Nine:
Stuff the corduroy sleeve with stuffing as tightly as possible. Position the “poof” on top of the corduroy sleeve and keep it held tightly to avoid stuffing flying everywhere. Secure the poof to the sleeve by stitching around the edge. One stitch in the top fabric, one stitch in the bottom sleeve, continue all the way around the circumference.
Step Ten:
Add some rick-rack, lace, or ribbon to the edges, and something for the top. Top with a button or a bead and you’ve got yourself a lovely little cupcake. ^_^
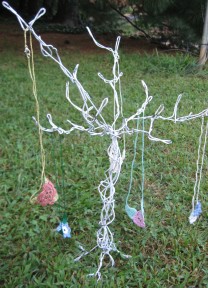
I was perusing a few images online- trying to think of a way to display necklaces at a craft fair. I really feel like minimalism is the best approach since it shows off your work, but I also love the idea of trees and nature- so I tried making a tree form out of coat hangers. It’s ridiculously easy to do, and if you do a lot of dry cleaning with a company that uses white hangers you can get this awesome old white tree look to your stand. There’s no right or wrong way, I’m sure. You simply use a pair of needle-nose pliers (I used a Leatherman) and untwist the coat hanger, then start bending into a root, trunk, and branch. Make another and intertwine them. Make another and another, interweaving the trunk (I wrapped mine around the first one) until you have as many branches as you want. Fun- easy- and a great way to display jewelry on your dresser or somesuch.


