At our family reunion this summer there was only one thing I was absolutely adamant about, and that was the T-shirts. I wanted hand-silk-screened shirts. I thought it would be more memorable, more important, more infused with family-ness if I printed all 20 T-shirts myself. (doll shirts not pictured) PHEW!
While it was a lot of work- I don’t regret a moment of it. However, I learned a lot that I wish I had read on a blog somewhere, so I wanted to share my process.
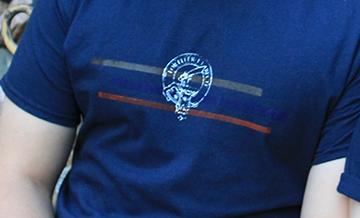
 (Our family roots are Scottish and we were apparently horse thieves, so our shirt has our Scottish Clan crest with a horse head on top for good humor, and three stripes of the tartan colors below. I did an alternate shirt for people who didn’t think the horse thing was funny. )
Materials I used:
T-Shirt
Black and white design printed onto Acetate (overhead projector
Picture frame minus picture- but with glass, from thrift store
Speedball Photo Emulsion, plus primer, usually sold in a kit, and Speedball Fabric Ink
Old silk curtains from thrift store, preferably with a very fine mesh
Staple Gun
Squeegee
Big cardboard box
Sun
Step One “Make the Screen”:
Set glass from frame aside. With a helpful friend, staple the silk to your empty frame. I suggest starting on one side, then do the opposite side, then do the top and bottom, starting always in the middle, pulling the screen super tight every time. The tauter/tighter your screen- the better it works.
Step Two, “Prep the Screen”:
Mix the photo Emulsion and Primer really well and write the date on the bottle so you will know when it will expire. You will store it in the fridge after pulling your screen.
It an almost black environment (I had the lights on in another room while I was in the kitchen at night), generously spoon the emulsion all along the edge of the squeegee, careful to hold your squeegee horizontally, but at a 40 degree angle from the sink so it doesn’t fall off.
In your other hand, hold the screen vertically. Touch the edge of the squeegee to the bottom of the screen and change the angle of the squeegee upwards so that the emulsion all slides to the screen’s surface. Pull your squeegee upwards while exherting pressure against the screen. Pros can do this in one pull- but with homemade screens I usually have to do this a few times to get the screen evenly coated. You don’t want this to be thick! Some people coat the back, too. I did because someone told me to, but I never did this in a professional environment, so I dunno what the deal is.
Step Three “Hide your Screen and Wait”:
The hardest part. Get a big box that is lightproof to hold your screen. I suggest duct taping any holes to keep light out, and write a note on the box so curious people you live with won’t get in there. Set two blocks in the box where the frame’s edges can rest so that air can flow under your screen. (I used old VHS tapes, ha!) Put your wet screen horizontal and flat in this box immediately after squeegee-step, and close the lid. Put the box in the basement or in a closet- somewhere safe from light.
If you have an exposure lamp, you can wait 6 hours to expose, but if not- just wait overnight and continue in the morning.
Step Four “Expose”:
The next day, while in your dark place, look at your screen to make sure it is dry. There might be big dots of emulsion where you were a little too generous- as long as these aren’t in the middle of the screen where you are printing, no big deal. If they are- you will have to start over since the blob will ruin your print. This is one reason I suggest making at least 2 screens at a time.
Place your black and white copy on acetate of your screen print onto the blue/green surface of the screen, careful to think about how it will print (words facing the right way?). You will put ink in the “well” side of the screen, so consider that the flat side will be on the fabric. Tape the acetate on the top and bottom to the screen. Now take that piece of glass from the frame and sandwich the acetate between it and the silk. This will keep your acetate from moving or creating a shadow exposure.
Take your screen out to the beautiful sunlight. And put it glass-up onto a flat surface like concrete or a table- preferably a black surface that will absorb light and not reflect it onto the back of your screen. Do not let any light between the frame and your flat surface or it will expose the back of your screen.
I baked my screen for 6 minutes in the morning sun. How did I find this time? It took me 5 attempts to figure this out. The first one I did for the 45 minutes that one blog called for- and it was so overexposed that nothing washed out. However- I live in Colorado and we have a powerful sun. Still- 6 minutes. Awesome.
Step Five “Wash Out”:
When the time is up, quickly take your screen to a powerful hose or a sink with a good attachment. Remove the glass and the acetate and tape. Spray that screen good. It will take a while. I scrubbed mine with a brush, but sometimes you can just brush it gently with your finger tips. The parts of your acetate that were black should run out of the screen and be left white, while the rest stays green.
When all of the parts you wanted to wash out are washed, your may choose to patch holes in your screen with more emulsion, or tape over these parts later with painters tape. Either way, put your screen out in the sun to dry and finish baking so that everything is well hardened.
Step Six “Pull your Screen”:
People have fancy ways of doing this. I do not.
Lay a doubled up towel on the kitchen table. Put your fabric down on the towel. Smooth with your hands so there are no wrinkles. Place your screen flat-side-down onto the fabric. Spoon some fabric-screen-printing ink onto the topmost part of the screen where there are no white spaces. Set your squeegee into the ink and make sure that the line of ink will cover your entire surface in one pull. Putting pressure down on the frame with one hand, and the squeegee with the other, pull the squeegee towards you in a smooth motion. Pressing very hard will only allow a little ink through the screen- pressing only a little will allow more ink through the screen. Your choice. Again- this should be done in one pull, but some people (guilty!) swipe a couple times to be sure.
You can repeat this process over and over again with the same color. I advise washing and drying if you want to change colors on multiple fabrics/shirts. I also advise washing out your screen if you take a break because if the ink dries on your screen it will be as strong as the emulsion and ruin your screen. Let the fabric dry between printings if you want to print another screen on top of that one. Otherwise things get messy and it’ll pick up wet ink and transfer it to your next piece. Oops!
Anyway, when you are all done you can either try to use the store-bought stuff that hypothetically dissolves emulsion so you can use your screen again- but it almost never works for me. I usually rip off the screen and put a new on on instead. Then again, using cheap curtains, I can afford to do that.
I hope this helps someone out. Printing your own designs is very liberating and I think everyone should try it once!